Integrating AWS S3 with Payload CMS: A Complete Guide
Looking to store and manage your media files efficiently in the cloud? This guide walks you through the complete process of integrating AWS S3 with Payload CMS — from setup and configuration to seamless asset uploads and retrieval. Whether you’re aiming for scalability, security, or performance, this step-by-step tutorial helps you connect your Payload CMS to an S3 bucket and streamline your file storage workflow.

Imagine you are uploading images, videos, or documents just once, and they are about to be automatically stored, versioned, and delivered at a rocket-level speed from anywhere to anywhere in the world. That’s exactly what can happen when you bind AWS S3 with Payload CMS.
Efficiently managing files isn’t going to be all about storage alone. Include security, scalability, and performance. Payload CMS, a powerful headless content management system that offers developers complete control over the data as well as the content workflows. By getting paired with AWS S3 media storage, it becomes a production-grade setup ideal to manage massive content and user-generated uploads.
AWS S3 storage adapter (or Payload CMS upload adapter), where a user connects CMS to Amazon S3 buckets, which ensures that the assets are stored safely and efficiently & also served globally in a latency that is in a minimum level. Whether configuring a Payload CMS S3 connection via the Direct, ARN or Access Point method, this integration offers a flexible and also secure way to handle the mass uploads.
Let’s walk through what AWS S3 and Payload CMS are, how to properly configure the S3 storage adapter, the best practices to follow for Payload CMS file storage, and finally, how to deploy Payload CMS for free.
“Digital for storage and quickness. Analog is for fatness and warmth.”
What is AWS S3?

Amazon Simple Storage Service (AWS S3) is a cloud-based object storage platform that lets you store and retrieve any amount of data from anywhere on the web at any time. One of the most widely used services in the ecosystem of AWS, known for its durability, scalability, and low cost.
In the core level info, AWS S3 works by storing data as objects inside buckets. The object can be anything in any form. Right from images and videos to JSON files or large application backups. Every object or every file can be identified within a bucket by a key (name or path).
From developers' POV, the AWS S3 integration is a kind of game-changer. Taking a lead on eliminating the limitations of the local file storage that helps to handle the user uploads, such as doc. and media, from your application end, and do deliver properly with minimal infrastructure management. With the help of AWS S3 media storage, files are stored in a safe and secure place and are distributed via Amazon’s global content delivery network (CDN) in order to provide faster access.
Key Benefits of AWS S3:
- Scalability: Deals with millions of uploads
- Security: Integrates with IAM roles, policies, and encryption.
- Performance: Quick content delivery
- Integration Ready: Works smoothly with Payload CMS S3.
When there is a benefit, there are going to be disadvantages too.
- Network Latency over distant regions
- Data Management Challenges
- Potential Performance Issues
- Latency while accessing files
- Unpredictable Costs
There are multiple architectures and many pipelines that we can see in AWS S3. Let’s discuss one of that:
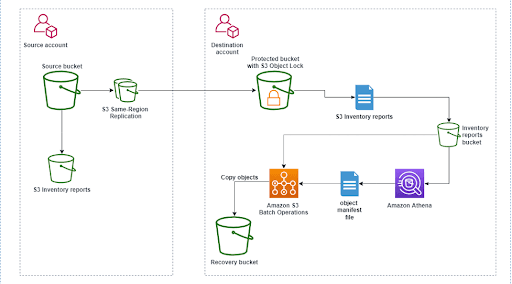
1. Source Bucket (Source Account)
- Stores the main data.
- S3 Inventory reports are generated for this bucket.
2. S3 Same-Region Replication (SRR)
- Automatically copies (replicates) data from the source bucket to a destination bucket within the same AWS Region.
3. Protected Bucket with S3 Object Lock (Destination Account)
- Receives replicated data.
- S3 Object Lock protects the data from being deleted or modified (immutability).
- Generates its own S3 Inventory reports.
4. Inventory Reports Bucket (Destination Account)
- Stores all S3 Inventory reports from the protected bucket.
- These reports list all the objects stored in the S3 bucket.
5. Amazon Athena
- Reads and analyzes the S3 Inventory reports using SQL queries.
- Produces an object manifest file (a list of objects to process).
6. Amazon S3 Batch Operations
- Uses the manifest file from Athena to perform bulk actions on selected S3 objects (like copying or restoring them).
7. Recovery Bucket (Backup Storage)
- Acts as a backup or recovery location.
- Objects are copied here from the protected bucket when needed.
Data from the source S3 bucket is replicated to a protected destination bucket with Object Lock, tracked using inventory reports, analyzed with Athena, processed through S3 Batch Operations, and backed up in a recovery bucket for secure data protection and recovery.
What is Payload CMS?
It’s a modern, TypeScript-based headless CMS that was specifically for developers who want complete control over their backend, APIs, and content management experience. Where traditional CMS platforms lack in flexibility and performance, but offer the power to build, customize, and self-host your complete content system.

At its core level, Payload is more than a CMS, which is a backend framework that includes an API layer, admin dashboard, and database integration out of the box. Creating a marketing site, SaaS product, or digital asset library, Payload provides everything needed to order and manage data models, users, authentication, and uploads effortlessly.
When paired up with AWS S3 integration, the Payload becomes a highly scalable file management solution. Using the Payload CMS S3 storage adapter, developers are able to store uploaded media directly in the Amazon S3 buckets, ensuring secure, globally available & deliverable content. This all makes it perfect for enterprise-grade applications where the performance is critical.
Developers Choose Payload CMS for File Storage:
- Seamless Upload Management: Connects easily with the AWS S3 storage adapter.
- Data Security: Access control over the content & uploads.
- Extensible Architecture: Custom endpoints, hooks, and S3 configurations.
- Cloud-Ready: Reducing the load on the server.
- Developer-First Design: Offering complete control, and it's 100% self-hosted.
Integrating AWS S3 with Payload CMS, we move from basic file storage to a robust, cloud-optimized media management system that is capable of handling things that are in large-scale uploads, CDN delivery and also high-traffic content workflows in an effortless manner.
How to use the S3 storage adapter in Payload CMS?
The Payload CMS upload adapter (or the AWS S3 storage adapter) is a way that helps you connect your Payload project with Amazon S3 in order to store and serve media files. Where we can set this up into three different methods, it all depends on the project scale and permissions for organization setup:
- Direct Method (Bucket Name): A simple setup for quick testing or for a development env.
- ARN Method (Recommended One): Ideal for production use with better control and security.
- ARN with APM (Access Point Method): setup for large teams and multi-account environments
Payload CMS S3 integration allows you to store media files like images, PDFs, and videos directly in Amazon S3 buckets instead of your local filesystem. This provides better scalability, faster delivery, and stronger data durability.
Direct Method (Bucket Name)
A simplest also an easy way to set up your AWS S3 integration with Payload CMS, where you specify your S3 bucket name, access key, and secret key inside your Payload configuration file.
Best For:
- Testing environments
- Personal projects
- Early-stage prototypes
1//payload.config.ts2const s3Plugin = s3Storage({3 bucket:4 process.env.S3_BUCKET ??5 (() => {6 throw new Error('S3_BUCKET environment variable is required')7 })(),8 config: {9 credentials: {10 accessKeyId: process.env.S3_ACCESS_KEY_ID!,11 secretAccessKey: process.env.S3_SECRET_ACCESS_KEY!,12 },13 region: process.env.S3_REGION!,14 },15 collections: collectionsArray16 .filter((col) => col.upload)17 .reduce(18 (acc, col) => {19 acc[col.slug] = {20 signedDownloads: {21 shouldUseSignedURL: () => true,22 },23 }24 return acc25 },26 {} as Record<string, { signedDownloads: { shouldUseSignedURL: () => boolean } }>,27 ),28})2930export default buildConfig({31plugins: [payloadCloudPlugin(),[s3Plugin]],32})
This method gives you quick setup and easy uploads, but it’s not recommended for production due to limited permission control.
ARN Method
ARN (Amazon Resource Name) method is the recommended approach for most production setups. Instead of using plain credentials and bucket names, it uses IAM roles and bucket ARNs for better security and scalability.
Best For:
- Production workloads
- Multi-user environments
- Projects with strict IAM policies
⚠️Note: The Paylaod CMS does not support ARN Method (as of payload version "3.56.0" )
ARN with Access Point Method
For enterprises or large teams using multiple AWS accounts, the ARN with Access Point method provides the most secure and scalable setup. Access Points simplify data access control across multiple users and services without exposing the main bucket.
However, this method is not yet fully supported in Payload CMS up to version 3.56.0, so it may require custom configuration.
Best For:
- Large organizations
- Cross-account S3 access
- Strict compliance environments
⚠️Note: The Paylaod CMS does not support ARN Access Point Method (as of payload version "3.56.0" )
Best Practices to follow and Benefits
To ensure a better and smoother performance, with a maintainable architecture and secure access, it is better to follow a few best practices, especially when working in multi-environment or production setups.
1. Disable Uploads in Non-Production Environments
While working locally in an environment, it’s always best to disable the AWS S3 uploads. Instead, use local storage for faster development with fewer in API calls. It all prevents unnecessary data fillings and protects production data from the accidental overwrites.
1//payload.config.ts23export default buildConfig({4 plugins: [payloadCloudPlugin(), ...(!isDevelopment ? [s3Plugin] : [])],5})
2. Use Separate Buckets for Staging and Production
Never share same S3 bucket between staging and production. So, better create separate buckets, like:
- payload-stage-bucket
- Payload-prod-bucket
This separation ensures that Payload CMS file storage remains organized, avoids version-based conflicts, also simplifies data management among environments.
3. Create Separate IAM Users and Policies
Each env. or project should have its own IAM user with user-limited permissions to the relevant bucket.
Example IAM policy principle:
- Allow only s3:PutObject, s3:GetObject, and s3:DeleteObject on the specific bucket.
Reduces the risk of data exposure and keeps your Payload CMS upload adapter operating under the principle of least privilege.
4. Use Dedicated Access Points for Large Organizations
If your organization manages multiple apps or teams, create separate Access Points (APs) for each one. Access Points simplify permission management and enable fine-grained control over uploads without modifying the main bucket policy.
This is especially useful when using the ARN with Access Point method for enterprise-level Payload CMS S3 integration.
5. Enable Versioning and Encryption in S3
Always enable:
- Versioning: to recover overwritten or deleted files
- Server-Side Encryption (SSE-S3 or SSE-KMS): to protect files at rest
This ensures your AWS S3 media storage complies with modern data-security standards and supports audit-friendly file management.
How to Deploy Payload CMS Quickly
After configuring the AWS S3 integration with Payload CMS, the ideal next taking step is to make your project on-live without any investments or spending. There are several hosting platforms who offers free-tier deployments which work perfectly with Payload CMS’s self-hosted architecture.
Let’s see how to deploy Payload CMS in a free way, while keeping the S3 storage adapter connected also functional.
1. Deploy Payload CMS on Vercel (Recommended Free Option)
“Vercel” is one of the easiest and most trusted way to host Payload CMS at free of cost. Which supports Node.js natively, offers automatic deployments from GitHub, and allows environment variable configuration for the AWS credentials.
Steps:
- Push your Payload CMS project to the GitHub.
- Create a free account on the vercel.com.
- Select “New Project” then connect your GitHub repo.
- Go to Project settings -> Environment Variables and Set req. environment variables for:
- S3_ACCESS_KEY_ID
- S3_SECRET_ACCESS_KEY
- S3_REGION
- PAYLOAD_SECRET and database credentials
- Deploy render will build and host your Payload CMS automatically.
Vercel is a great option to host small web apps but has limitations, if you're building more than just small app you could prefer hosting solutions like a VPS or Kubernetes.
2. Deploy it on Railway (Fast & Developer-Friendly)
“Railway” offers a flexible free tier that builds pipelines automatically, env. management, and MongoDB integration, making it a great choice for Payload CMS file storage projects.
Setup Steps:
- Import the GitHub repository into Railway.app.
- Add your env. variables under the project settings.
- Link MongoDB (via Railway plugin or external cluster).
- Deploy the project: Railway handles the rest & everything automatically.
Railway’s build the containers and can handle background processes efficiently, ensuring your Payload CMS upload adapter continues to work without hassle with the AWS S3 media storage.
3. Use AWS Free Tier (Self-Hosted Option)
If you prefer complete control, then go for an option that offers self-hosting to deploy Payload CMS directly on an AWS EC2 Free Tier instance. Which gives you direct access to AWS’s internal network and full permissions for S3 bucket integration.
Key Steps:
- Launch an EC2 instance using the free-tier AMI.
- Install Node.js, npm, and MongoDB.
- Clone your Payload CMS project and install dependencies.
- Configure .env variables for AWS S3 storage adapter.
- Run npm run build && npm start to start your CMS server.
Though setup might seem more manual, but it’s ideal for developers who want complete control over their AWS S3 integration and in internal network configurations.